Key steps to self publishing
Key steps and references to help prepare for self publishing on Amazon Kindle and CreateSpace Print On Demand (POD)
I recently helped Nicola published her novel The Belvedere Club on both Amazon Kindle and CreateSpace Paperback POD.
Publishing on these two medium is not hard. If you are not the preparing type, you can just jump into each of the publishing steps on the respective sites below, and figure it out as you go. The process does not have to be done all in one go. You can stop at any step, figure things out and get back to it when you’re ready.
If you are the preparing type and want to go through the process smoothly, there are many online resources to help you prepare for it. However, after having gone through that process, the information out there is all over the place. If I had had a simple logical outline, of all the things that needed to be done and prepared before going through the process, it would have made our life easier and saved us a lot of back and forth.
This is an attempt at providing such an outline 
First, if you are thinking of self-publishing on Amazon Kindle, but had no plan to publish in paperback, you should think again. There are several ways to do Print On Demand (POD) today, which do not require much more work, and you will give your readers the choice between eBook and paperback (which many people still prefer). You can investigate the various providers, but if you are already publishing on Kindle, there is one obvious candidate: CreateSpace the Amazon arm for POD.
You can jump to each section with the links below
1) Accounts
2) Reading
3) ISBN
4) Size
5) Content
6) Pricing
7) Publishing
8) Marketing
1) Accounts
Publishing with KDP (Kindle Direct Publishing) and CreateSpace will require for you to have or open two accounts.
An Amazon / KDP account (if you have an Amazon Buyer account you can use that)
Link to KDP account login
A CreateSpace Account
Link to CreateSpace account login
2) Reading
For the steps involved in Kindle publishing, the KDP “Help” pages are at the link below. On the left side are the chronological steps and I encourage you to read each of them in sequence to get a full understanding of what you will be going through.
Link to KDP “Help” pages
CreateSpace “Help” is not as well laid out, but below is the start page for most of the info you will need.
Link to CreateSpace “Help” pages
3) ISBN (Back to top)
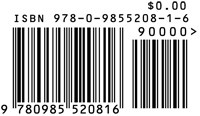 Published books need an ISBN. Look it up if you do not know what that is.
If you decide to provide your own ISBNs, you need to get them from Bowker, the US ISBN agency ( Link to Bowker US ISBN agency ). You can open an account with them here ( Link to Bowker account page ) to buy, hold, and mange your ISBN numbers.
You will need a different ISBN for each format, so one for the Kindle version and one for the Paperback version. You can buy them in bulk and use them as you publish more books or different formats.
Note that Amazon and CreateSpace will provide free ISBN for you if you like, but you can then only use them when distributing through their channel. If you plan to distribute/publish with other companies down the line, you may want to acquire your own ISBN. If you acquire your own ISBN, you become the publisher and will need to decide on a publishing company name.
Bowker will charge you $200 for 10 ISBNs.
Tip: For the CreateSpace version, you will need to actually generate an ISBN barcode to be included in your cover design. When you do that, you will be asked if you want to select a price. If you select a price for your ISBN, it cannot be changed, so if you want to change the price later on, you will need a new ISBN. BUT you have the choice not to specify any price on the ISBN (the price code will then be 9000). In my opinion, this is the better method. See more on pricing below (Item 6).
4) Size (Back to top)
You should decide right away on your Paperback book size as both content and cover will need to be precisely finalized for it. Look at existing books and decide what you like. Changing your mind on size will require reformatting both the content and the cover.
Below is the page with the available formats
Link to CreateSpace book formats (trim size)
5) Content (Back to top)
The main things to finalize are the book content and the cover.
THE BOOK
Nicola already has a blog article on the subject so I will try not to overlap.
You will need two different files: one for Kindle and one for CreateSpace paperback. Before branching your original document into these two, you want to finalize the following common content and formatting.
In addition to the book itself, you need to create the pages that go before and after the main content.
Before the content (Look at existing books for inspiration):
- A Title page with book title and your publishing company name (if providing your own ISBN)
- A Copyright page which will also include your ISBN number if you bought your own, the permissions and publisher’s note (i.e. Disclaimer). It is good to add a reference to your website under the copyright.
- A Credit page where you give credits and thanks to the people who participated and helped you with the book.
- Eventually, a dedication page or any other page preceding the content,
After the content:
- An About the Author Page with a short Bio. This content will also be useful for your Amazon & CreateSpace Author pages.
- Also add reference to your Website on that page.
Make sure to add page breaks after each of these pages.
Then you want to cleanup the common formatting. If you are using Word, this means making sure all the chapter titles use the same style (like Heading 1), that all the normal text uses a common style also (like Normal), and that the formatting (first line indent or paragraph spacing, line spacing, justification…) is done in the style itself, so it can be changed in one place easily.
Having the chapter titles use a common Heading style is important as it will allow you to create the Table of Contents in each of the two files. Also make sure you have page breaks before each chapter.
Once all the common stuff is finished (content and formatting), create two copies of the document (like one called Kindle-Book and one called CreateSpace-Book).
You then need to customize each one differently.
For the Kindle-Book Document:
 To get an approximate view of what your book will look like, you should change your Page Setup to reflect an eBook screen. A width of 3.5” and a height of 5”, with margins of 0.25” will be close to most eReaders’ screen size, but all screens are different so this is just to get a feel for what people will see on a small screen.
- Kindle books (eBooks) do not have fixed page numbers because eBook devices have different screen sizes and therefore pages will flow differently on each of them. So you should remove all page numbers if you have any in the document.
- Create the Table of Contents where you want it. In Word, this is an automatic insert function that will use the Heading Style to find and reference your chapters. Because eBooks do not have page numbers, use a style that does not show page numbers in the Table of Contents, but make sure you select the option to have links as these will be active on the eBook.
- This next step is normally not required if you upload the book in Word format, but will be if you use HTML (and you may have to). I suggest you do it as it can only help. On Word, you want to insert a Bookmark on the Table of Contents’ title. Click on the title, Insert Bookmark, and call it toc . This will identify the location of the Table of Contents in the HTML file so people can use the Goto Table of Contents feature on their device.
- If you want, you can adjust the content formatting styles (smaller first line indent, for example).
This should be all that needs to be done on the Kindle file. Take the time to go through it and test the Table of Contents links.
File Format: KDP lets you upload a Word file during the publishing process. Normally, this is all you need for Kindle. But I found that their conversion of a Word file into a Kindle format sometimes contained errors. In our case, for no apparent reason, some first lines lost their indentation, and there was nothing we could do to prevent it. The only way to avoid these errors is to create an HTML file and upload that instead. This did not create any conversion errors.
So I suggest you go ahead and prepare an HTML file, too. In Word, you can simply Save As, and choose Filtered Web (or Filtered HTML). It is important to choose the Filtered option.
For the CreateSpace document:
As you have already decided the size of your book, you can download the Blank Word template for that size on the page below:
Link to CreateSpace book templates
It will help you finalize the CreateSpace version of your document.
- You have two ways to use the Template. You can either open it and look at the Page Setup parameters and put them inside your own CreateSpace-Book document, or you can copy paste your content inside the CS template. What really matters here is to match the layout parameters (in Word, Page Setup tabs). Margins, gutters, paper size, etc…
- Once the layout matches your final book size, make any formatting adjustment you need for that version (Line spacing, Indent…)
- Get your page numbers on. You probably want them to start on the first chapter, and not be on the author page after the end.
- Pay attention to odd and even pages (right and left), CreateSpace format will have a larger inside margin and a narrower external margin, making it easy to spot. Book title and first chapter should be on a right page. Check these carefully and insert blank pages where needed.
- Once pages are good, create the Table of Contents. This time you probably want a style showing page numbers for each chapter.
That should do it for your Word version of this document.
File Format: As for Kindle, CreateSpace allows you to upload Word documents and they take care of converting it to PDF. Now we may be unlucky, but there, too, we were faced with a conversion bug CreateSpace could not fix. If you do too, then the solution is to generate your own PDF. In recent versions of Word you can Save As PDF from Word. If you use an older version, you can look for free converters on the Web. The one I found was doPDF 7.
The PDF version uploaded without any conversion issues.
You are done preparing the two file versions of your Book.
THE COVER
CreateSpace version:
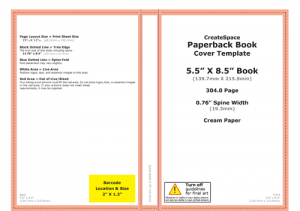 When creating the Cover, you want to start with the CreateSpace one as it is the more complete / complex, and the Kindle version will simply be a subset of it.
You have two approaches here:
A) Use the Online CreateSpace Cover Creator Tool. For that you need to actually start the publishing process as it can only be accessed form there.
B) Use your own image creation program or subcontract to someone who does.
If you go for B, then you can generate the CreateSpace Template for your Book trim size on the page below.
Link to CreateSpace cover template generator
That generator will require your chosen book size, but also the paper color (cream or white) and the TOTAL number of pages of the book. Because every time you change any of these parameters, the dimensions change (especially the spine), you really want to have finalized the above content and be sure of your choices before beginning the cover, or you will be doing a lot of back and forth.
- The generator creates a PNG file and a PDF file. If you use an image program like Photoshop (or the free alternative GIMP) use the PNG file.
- Just load the template file in your image creation program, and design on top of it (using layers if you have them). The Template file is set for 300dpi and includes an area larger than the actual book. It shows the front, back and spine area, as well as the Bleed area (your design needs to fill that bleed area).
- You will probably want to put the Book’s Synopsis on the back cover, as well as a short biography of the author (can be the same as the text you used for About the Author at the end of the book).
- If you have your own ISBN, you need to get the barcode image from your provider, and paste it in the proper location as shown on the template (if it is an .eps file remember to specify 300dpi when you import it).
- Once the design is done, proof it, then print the front and back on photo paper to judge the quality.
- Save the image in the native format of your application so you can go back and make changes any time.
- Then save a copy in PDF format. Make sure only your design on the white background of the template is showing. Use the “High quality print” PDF output format as advised by CreateSpace, this will be the file to Upload.
- Open that PDF to verify the content one more time and check the final quality that should be high especially on Text.
Kindle Version:
- Duplicate the previous File (your application native file like Photoshop), under a different name for the Kindle version. Open it and crop the content to only keep the front cover part, getting rid of everything else, including the no longer needed bleed area.
- Generate a small jpeg version of the image (250px high) from that file to test the readability of the icon on the Amazon site. If text is not readable at that size, you may want to change the font size for the title and/or your name so they are clearly readable on a small 250px high icon.
- Once satisfied with readability in the smaller version, save the full size Kindle cover in the native format of your application so you can go back and make changes any time.
- Then save a full size, high quality Jpeg version of it. This will be the cover file to upload for KDP.
6) Pricing (Back to top)
During the publishing process, you will be asked to choose pricing. Below are a few tips for each format.
Kindle:
You first will have to choose a Royalty rate, 35% or 70%. Why would you not choose 70% is the question? Some technical differences are explained in the Royalty FAQ on the KDP Help page as well as the Legal > publishing terms and condition > Royalty on that page, but here is the main (not so visible) reason.
Under the 70% scheme, Amazon will deduct a fixed delivery cost for your book, which is proportional to the size of your uploaded file (the book only, not the cover) $0.15 /MB. For a text only book, this is not an issue as your book file will most likely be below or around one MB. But if you have images in your book, then the size can quickly rise and the fixed delivery cost with it. In this case the 35% royalty rate, which has no fixed delivery cost may be more suitable.
Once you decide your royalty rate, and know the fixed cost, you can determine what your margin will be.
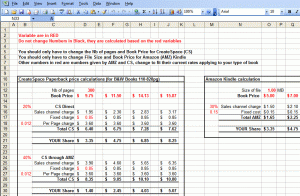
You can use and download an Excel Sheet at the link below to simulate various prices for CreateSpace and Amazon and see your corresponding share. Open the link below then check the file and select “Open in Excel” or “Download” on the right.
 Link to price/royalty calculation Excel sheet
CreateSpace
CreateSpace Royalty page is here
Link to CreateSpace royaty page
On top of their Sales Charge %, CreateSpace has fixed charges, but also a Per Page charge. This means that the more pages your book has, the more the PP charge.
In the Excel sheet below you have calculation examples for B&W books with 110-828 pages. You can modify the variables to adapt to other types of books. Open the link below then check the file and select “Open in Excel” or “Download” on the right.
Link to price/royalty calculation Excel sheet
7) Publishing (Back to top)
You should now have the following ready to go for your publishing steps:
- A selling price for each version
- A size for the paperback
- A Word and a HTML File for the Kindle version
- A Word and eventually a PDF File for the CreateSpace Version
- A high quality PDF File for the CreateSpace Cover and a native image program file for editing.
- A high resolution, high quality Jpeg File for the Kindle Cover and a native image program file for editing.
You should also prepare:
- A Synopsis of the book
- An About the Author short Bio
- A full Bio (for the Amazon Author page)
- 7 keywords the most relevant to your work when people will be searching for a book
So go ahead and start the process at each of the two sites below.
Amazon / KDP
Link to KDP account login
CreateSpace
Link to CreateSpace account login
For each of these, the key step is after you upload the Book file.
Each site will allow you to preview the file to check for errors. If, after uploading the file, you find problems in their previewer, you can go back to your original (Word) document and make the necessary changes; then upload again and check if the problem is fixed.
A few specifics on each previewer.
Kindle.
You have two previewers, a basic one, and one you can download with more features.
I suggest you download and install the previewer on your computer and download the preview file (in mobi format).
- Don’t really judge quality on the previewer just formatting, content, page breaks, and the Table of Contents links.
- Also test the Goto Table of Contents button
- The previewer does not show the cover
- You can also copy the preview Mobi file in any tablet and test it allowing you to preview on different devices (again there will be no cover; this is not the final file).
CreateSpace.
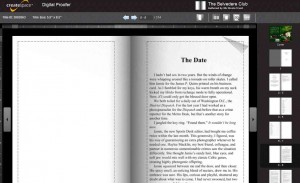 This is a very nice page turning simulation of a real book. The key things to check here are:
- Odd and Even pages. If you are missing a white page in your original, you may end up with right pages being on the left and vice versa, which will generate errors because content ends up outside of the safe zone
- Title page and first chapter start on a right page. Check if you need to insert white pages to make this so
- Formatting (line spacing, indents…)
- Content is all there and accurate
- No page numbers on the pages before and after the book content
- Most important! Are the page numbers the same as your original? Specifically, do the chapter page numbers in the Table of Contents match the actual page number at the start of each chapter? The bug I encountered when uploading the CreateSpace version of the book in Word format was that converted pages were one line shorter than my original, creating a progressive shift in page numbers. The solution to that was to create my own PDF and upload the PDF version instead of the Word version.
You will most likely have to do a few back and forth at this stage of the process (correcting original document, converting to Html or PDF, uploading, previewing) until the content is 100% right in the previewer.
Once all is uploaded and correct, then you can hit publish and complete the rest of the process.
Amazon kindle will automatically appear for sales a day or two after
CreateSpace will first ask you to do one more proofing of the final book with a choice of Online Digital proofing and/or sample print ordering.
I suggest you first check the Online Digital proof, and if this is correct order a physical sample to be 100% sure before accepting the book as final.
Note that the cover will only show in low resolution in the Digital Proof, but do not worry the final print is high quality (as long as you submitted a high quality PDF).
For your actual printed copy they tell you it will ship within 9 days, but ours was shipped the next day (on a Saturday).
8) Marketing (Back to top)
I won’t go into details here (maybe in the future when we have had more experience with it  )
)
You can browse KDP help section for some initial insights, but there is at least one more step once the book is published.
Amazon Author Page
You need to create your Amazon author page at the link below
Link to Amazon author page
- Fill in your profile with picture, long Bio, Twitter account, Blog link…
- Go to the Book tab where your book should show up
- Click on the book title to access more options
- In the editorial review tab, fill in empty sections, especially the About the Author section, and check the other tabs
- You will get an email with the link to other countries’ Amazon Author Pages. Feel free to open an account on each of these (you should at least do Amazon UK) and fill in your personal info there
ISBN Account
If you bought your own ISBNs, you should go to their management page and fill in all the details about the book, cover, content, publishing date, etc..
Hope this helps facilitate your self-publishing experience.
Nicola’s Elf
————————————————————–
Reference links:
Link to KDP account login
Link to CreateSpace account login
Link to KDP “Help” pages
Link to CreateSpace “Help” pages
Link to Bowker US ISBN agency
Link to Bowker account page
Link to CreateSpace book templates
Link to CreateSpace cover template generator
Link to price/royalty calculation Excel sheet
Link to CreateSpace royaty page
Link to Amazon author page


 To get an approximate view of what your book will look like, you should change your Page Setup to reflect an eBook screen. A width of 3.5” and a height of 5”, with margins of 0.25” will be close to most eReaders’ screen size, but all screens are different so this is just to get a feel for what people will see on a small screen.
Thank you, Nicola, for this very helpful how-to. I’ve bookmarked it and I’m sure I’ll be referring to it often.
Well, that’s a bang-up job you did. Great reference material!!!
Thanks Bette and Peggy! Hope this will help you with future projects.
Great post. For your Canadian readers, ISBNs come from //www.collectionscanada.gc.ca/ciss-ssci/index-e.html
you have to apply for an account, it’s not hard. The ISBNs are free.
Also, I have all my books in print with Createspace and I used their template for the cover. It seems to work just fine, and they generate the barcode.
If you are interested in using their extended services you must use their ISBN.
Glad you found the information usefull and thank you for the Canadian reference!
Thank you so much. A lot of work. I will use the info. It will be very helpful. Larry
Happy to share.
All the best in your self publishing adventure :)
Love it! Great resource I can share with my authors!
Hi Beth, Thanks for stopping by. Please do share far and wide.
This is by far the best outline of how to do this. You have saved me a ton of work. I was trying to help a friend by explaining the whole CreateSpace/eReader thing. Thank you!
I wish I had something insightful to add.
I am glad you find it usefull.
Feel free to share :)
Great outline!
There are so many great resources out there for authors now – especially if you’re interested in only e-books but would prefer your book is distributed to all retailers (instead of just Amazon/Kindle). I encourage you to try a free DIY e-publisher called Booktango for your next venture!
Pingback:Happy New Year!